The Sanitation Priorities Created by a Water Shutdown
A water outage changes sanitation from a routine household task into a containment problem. Toilets may still flush once or twice using stored water, but repeated flushing can quickly exhaust a limited supply. Sinks, showers, laundry machines, and dishwashers also become less useful, while hands and frequently touched surfaces accumulate contamination more readily.
The first priority is human waste, followed by hand hygiene, surface cleaning, and general trash control. That order matters because waste can contaminate floors, footwear, hands, and nearby supplies. A household with plenty of disinfectant but no reliable toilet substitute is less prepared than one with a simple lined bucket, gloves, and a way to seal used bags.
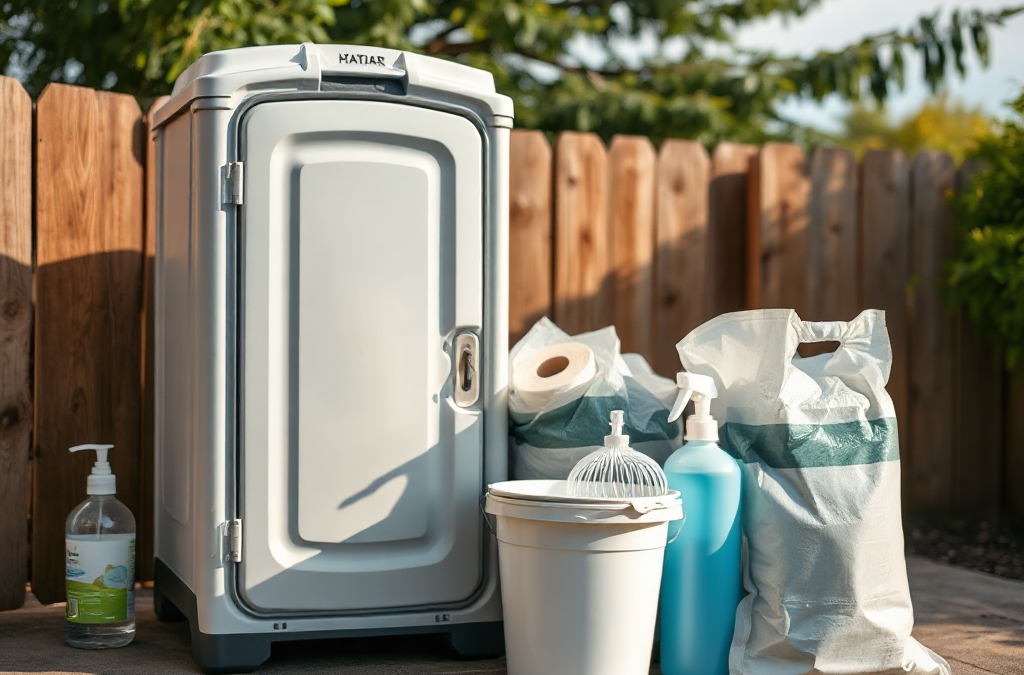
Think in terms of separate stations rather than one oversized supply box. A toilet station needs bags, liners, toilet paper, absorbent material, and a lid or cover. A hand-cleaning station needs soap and water when available, alcohol-based hand sanitizer for compatible situations, paper towels, and a waste container. A cleaning station needs gloves, disinfectant, cloths or disposable towels, and a way to isolate dirty materials.
For example, a short outage in a small apartment may require compact supplies and careful odor control, while a multi-day outage affecting several people requires more bags, more hand-cleaning capacity, and a disposal decision. The mistake is treating sanitation as a single product category. It is a sequence: collect waste without leakage, prevent hand transfer, clean contamination promptly, and store used materials safely.
A useful related reference is What sanitation supplies matter when water service stops, especially when comparing sanitation needs with broader household water storage.
Toileting and Waste-Containment Supplies
The most useful toilet substitute is one that can remain stable, be lined, and be closed or covered between uses. A portable camping toilet offers convenience and a purpose-built container, but a sturdy five-gallon bucket with a secure seat can work for short-term household use when handled carefully. A regular open bucket is a poor choice because it is unstable, difficult to cover, and more likely to spill.
Use two heavy-duty bags as liners when the container design allows it. The inner bag catches waste; the outer bag provides backup if the first bag leaks or tears. Add a modest amount of absorbent material after use, such as sawdust, shredded paper, or commercially made absorbent. The goal is to reduce liquid movement and odor, not to fill the container with bulky material. Cat litter can absorb moisture, but scented products may be unpleasant in a poorly ventilated room.
Toilet paper, pre-moistened wipes, and disposable gloves belong at the station, not in a distant closet. Wipes should generally go into the waste bag rather than the toilet substitute unless the product and system specifically permit flushing. Keep a separate container for personal-care waste, because mixing loose items with the toilet liner can make handling harder and increase the chance of punctures.
A portable chemical toilet and a lined bucket involve different tradeoffs. The portable unit may control liquid and odor better but can require specific chemicals, replacement parts, and manufacturer directions. The bucket is inexpensive and adaptable, yet it demands disciplined bag changes and better odor management. Neither option eliminates the need to follow local public-health or waste-disposal instructions.
Replace a liner before it becomes too heavy to lift safely. A common failure is waiting until the bag is full, especially when it contains liquid. Heavy bags are harder to tie, more likely to rupture, and more difficult for one person to move. Tie or close each bag securely, place it inside a second container or bag when appropriate, and keep it away from food, children, pets, heat, and direct contact with living areas.
Hand Hygiene and Surface Cleaning
Hand hygiene supplies interrupt the transfer of contamination from waste stations to food, phones, door handles, and faces. Soap and a dependable water supply remain the preferred combination when water is safe and available. If water is scarce, alcohol-based hand sanitizer can serve as a practical alternative for visibly clean hands, but it is less useful when hands are greasy or visibly dirty.
Keep sanitizer near the toilet area and at the entrance to the food-preparation space. A pump bottle is easier to use with gloved or dirty hands than a small screw-cap bottle. Provide paper towels or clean reusable towels that can be laundered later. Bar soap is workable, but it should be kept on a draining dish rather than sitting in pooled water.
Cleaning and disinfecting are different actions. Cleaning removes soil; disinfecting applies a product intended to reduce microorganisms on a cleaned surface. If a surface has visible waste, first remove it with disposable towels while wearing gloves, then clean and disinfect according to the product label. Do not mix bleach with ammonia, acids, or other cleaners, and do not assume that stronger concentration is safer or more effective.
Prioritize toilet seats, bucket handles, faucet handles, light switches, doorknobs, and counters used for food. A household may have only a small amount of disinfectant, so using it on every floor is less sensible than reserving it for high-touch areas and visible contamination. Disposable gloves reduce direct contact, but they do not replace hand cleaning; contaminated gloves can spread waste just as readily as contaminated hands.
Consider disposable aprons or washable work clothing if repeated handling is expected. A useful comparison is paper towels versus cloth rags: paper creates more waste but can be sealed immediately, while cloth saves supplies but requires a safe way to store and wash it. The best choice depends on water availability, laundry access, and the number of people using the station. The linked sanitation supply checklist should be adapted to those constraints rather than copied unchanged.
Building a Workable Sanitation Station
A sanitation station works when every action can be completed without crossing the clean and dirty sides of the household. Place the toilet substitute in a private, ventilated location with a stable floor, nearby lighting, and enough room to tie or replace bags. Do not position it beside food, drinking-water containers, medication, or clean clothing.
Arrange supplies in the order they are used: fresh liners and toilet paper first, absorbent material within reach, gloves beside the container, and a lidded receptacle for used towels. Keep hand sanitizer outside the immediate waste container area so users can clean their hands without touching contaminated equipment. If children, older adults, or someone with limited mobility will use the station, stability and access may matter more than compact storage.
A compact priority list can prevent spending money on low-value extras:
First: a stable toilet container, heavy-duty liners, absorbent material, toilet paper, and a method for sealing waste.
Next: soap, stored handwashing water, hand sanitizer, paper towels, and a hands-free or easy-clean waste bin.
Then: disposable gloves, disinfectant, cleaning cloths, and protective clothing.
To wrap up: odor-control products, spare containers, and convenience items that fit the available storage space.
Test the arrangement before an outage. Sit on the toilet substitute to check stability, practice changing a liner with gloves, and confirm that the selected bags fit without stretching over sharp edges. A dry run often reveals that the container is too low, the bag opening is too narrow, or the cleaning supplies are stored too far away.
For a household with several people, assign a routine for checking the bag, wiping touch points, and replenishing the hand station. For one person, a smaller container may reduce storage demands but require more frequent changes. Overbuilding the station can waste space; underbuilding it can force unsafe improvisation when water service is already out.
Storage, Disposal, and Common Mistakes
Store sanitation supplies in a dry, accessible place and keep them separate from food and drinking water. Bags, toilet paper, and paper towels should remain dry. Disinfectants should stay in their original labeled containers, away from children and heat. Rotate products with expiration or degradation concerns according to label directions, and check gloves for brittleness or tears.
Disposal is the least predictable part of a water outage because local rules, collection schedules, weather, and the cause of the interruption can differ. Do not bury, burn, or place human waste into ordinary systems unless local authorities or the relevant waste service specifically permits that method. Follow public-health instructions if an outage affects a broad area, and contact the local utility or health department when the correct disposal route is unclear.
Several assumptions create avoidable problems. Flushing with untreated water may be inappropriate for some plumbing situations, and pouring large amounts into a drain can move contamination rather than solve it. Ordinary kitchen trash bags may split under wet waste. Scented sprays can mask odor without controlling the source. Disposable wipes labeled flushable can still create plumbing problems, particularly when water service or wastewater operations are disrupted.
Inspect the setup for signs of failure: leaks, torn liners, persistent odor, overflowing receptacles, contaminated handles, or sanitizer that is empty or inaccessible. A leaking bag should be isolated without squeezing it, placed into a second sturdy container, and cleaned up with gloves and appropriate disinfectant. If waste has spread beyond a manageable household spill, seek guidance rather than improvising with mixed chemicals or unprotected cleanup.
Sanitation planning belongs beside, not behind, water storage. The broader household sanitation plan should identify who will monitor supplies, where used bags will remain temporarily, and which official source will provide disposal instructions. That preparation reduces rushed decisions while preserving limited clean water for drinking, cooking, and handwashing.
Frequently Asked Questions
Can a five-gallon bucket replace a toilet during a water outage?
A sturdy bucket can serve as a short-term toilet substitute when lined with heavy-duty bags, kept stable, covered between uses, and emptied according to local guidance.
How many bags should be used for human waste?
Double-bagging provides a useful backup against leaks, but bag strength and container design matter. Replace bags before they become too heavy to lift safely.
Is hand sanitizer enough when water service stops?
Sanitizer is useful for hands that are not visibly dirty, but soap and safe water are preferred when available. Remove visible soil before relying on sanitizer.
What disinfectant should be kept for sanitation?
Choose a labeled household disinfectant and follow its directions, including contact time and ventilation. Never mix bleach with ammonia, acids, or other cleaners.
Where should used sanitation bags be stored?
Keep securely closed bags in a designated, shaded area away from food, water, children, pets, and living spaces until local disposal instructions are available.
Further Reading
Authoritative Sources
Academy of Nutrition and Dietetics eatright.org
Professional nutrition guidance, healthy eating resources, and practical dietitian-reviewed advice.
U.S. Department of Agriculture usda.gov
Official food, nutrition, agriculture, and consumer guidance from the USDA.
NIH Office of Dietary Supplements ods.od.nih.gov
Research-based fact sheets on nutrients, supplements, dietary intake, and safety considerations.
International Society of Sports Nutrition sportsnutritionsociety.org
Evidence-informed sports nutrition resources and position stands for active people and athletes.
Conclusion
A water-service interruption calls for a sanitation system, not a random collection of cleaning products. Give first priority to a stable lined toilet substitute, leak-resistant bags, absorbent material, toilet paper, and a safe way to close and isolate waste. Add handwashing or sanitizer stations, gloves, paper towels, and correctly used disinfectant so contamination does not travel from the toilet area to food and household touch points.
Before an outage, test the setup, check that bags fit, identify a temporary storage location, and find the local source for disposal instructions. Keep sanitation supplies dry, labeled, and separate from drinking water. These modest checks make the difference between a controlled household routine and unsafe improvisation when plumbing is unavailable.
Storing and using rainwater for emergency preparedness is becoming an increasingly popular emergency strategy. Rainwater is reliable, sustainable, and economical. Plus, it’s an ideal source of water for storing during drought conditions or in the event of natural disasters. We collect rainwater primarily to use in our gardening, lawn and livestock. It is an efficient and economical system that was easy to build and maintain.
In this article, we’ll discuss the benefits of using rainwater for emergency preparedness and discuss the various ways to create an inexpensive rainwater collection system. We’ll also cover the key elements of treating rainwater to make it safe for drinking and other uses.
The Benefits of Rainwater for Emergency Preparedness
Storing and using rainwater for emergency preparedness comes with many benefits. Rainwater is an abundant renewable resource and can be harvested and distributed efficiently, making it an ideal source of water in the event of drought or natural disaster. Additionally, because it’s separate from the public water supply, it reduces the strain on public water sources in the event of a crisis. Lastly, rainwater is generally free, making it an economical option for storing large supplies of water.
How to Build an Inexpensive Rainwater Collection System
Building an efficient and inexpensive rainwater collection system is an easy process. Start by finding a suitable location near a downspout and level it off to provide a stable foundation for the rain barrel you’ll be using.
Next, gather the necessary materials for collecting and storing rainwater, such as a metal or plastic barrel, a hose, and a lid. If you don’t already have these supplies, you’ll need to purchase them. Place the tank beneath the downspout and connect the hose to the tank. Your tank should now be ready to collect rainwater.
Do I Need to Treat Rainwater?
Rainwater can be used for a variety of everyday activities, but it should not be used for drinking unless it has been treated. If you’re short on supplies or don’t have access to other water sources, you may be tempted to drink the rainwater, but this can be harmful to your health. To make the rainwater safe for ingesting, it should be treated with chemicals like bleach, iodine, or chlorine to kill any harmful viruses or bacteria.
Conclusion
Using rainwater for emergency preparedness is a smart solution that is reliable, sustainable, and economical. Building an efficient and inexpensive rainwater collection system is relatively simple and requires minimal supplies. When using rainwater, it’s important to remember that it should be treated before drinking, as untreated rainwater can contain harmful viruses and bacteria. By following these guidelines, you can rest assured that you’re taking the right steps toward preparing for an emergency situation.
In the throes of disaster, access to clean, potable water becomes a paramount concern. The ability to purify water, a seemingly mundane task, can suddenly transform into a lifesaving skill.
This guide will arm you with essential knowledge and techniques to ensure your safety and survival. You’ll discover various methods of water purification, from boiling and distillation to chemical treatment and filtration, each with its unique advantages and applicability.
Embark on this journey to self-reliance and preparedness. Learn how to turn potentially dangerous water sources into safe, drinkable water, even in the most challenging circumstances. This is your ultimate guide to water purification during a disaster. Dive in, and let’s ensure your readiness for any situation.
What is water purification?
Water purification is the process of removing undesirable chemicals, biological contaminants, suspended solids, and gases from water. The goal is to produce water fit for specific purposes, such as drinking, medical, and pharmaceutical applications. In the context of a disaster, water purification becomes a life-saving necessity.
Boiling is a simple and effective method of water purification. It kills many types of disease-causing organisms. However, it does not remove chemical contaminants.
Distillation involves boiling water and then collecting the vapor that condenses back to water. It kills microbes and removes heavy metals, salts, and most other chemicals.
Chlorination is another common method used to purify water. It involves adding a measured amount of chlorine to water to produce a residual amount of chlorine. It is effective at killing bacteria, but not all protozoa and viruses.
Water filters are also a popular choice for water purification. They remove bacteria and other contaminants, depending on the type of filter used.
UV light is a more modern method of water purification. It kills bacteria and other microbes by damaging their DNA. However, it requires electricity, which may not be available during a disaster.
In a disaster situation, ensuring safe drinking water is crucial to prevent the spread of diseases. The method of water purification used may depend on the resources available and the type of contaminants present in the water.
Why is clean water important during a disaster?
Clean water is the cornerstone of survival, especially during a disaster. Dehydration can set in quickly, leading to a host of health issues such as dizziness, confusion, and even organ failure. Boiling water is a simple method to purify it, killing bacteria and viruses, making it safe to drink.
In situations where boiling is not possible, water purification tablets are a practical solution. These tablets can neutralize pathogens, providing drinkable water within 30 minutes. Remember, the goal is to eliminate harmful contaminants that can cause illnesses like cholera and dysentery.
Portable water filters are another option. These devices remove impurities through a physical barrier or a chemical process. They’re lightweight, easy to use, and can purify hundreds of liters of water.
During a disaster, clean water isn’t just needed for drinking. It’s also vital for maintaining personal hygiene and preventing the spread of diseases. That’s why having a rainwater collection system can be beneficial. It provides a sustainable source of water for washing and cleaning.
In closing, remember that the clarity of water doesn’t necessarily indicate its safety. Clear water can still contain microscopic pathogens. Therefore, regardless of the source, always treat water before consumption during a disaster.
Can boiling water purify it?
Boiling water is indeed a viable method to purify it, especially during a disaster when access to clean water may be limited. The process of boiling water eliminates harmful bacteria, viruses, and parasites that can cause diseases. The high temperature during boiling, typically at 100 degrees Celsius or 212 degrees Fahrenheit, is sufficient to kill most pathogens.
However, it’s crucial to note that boiling water does not remove chemical contaminants or heavy metals. If you suspect the presence of chemicals in your water, consider using a water purifier or activated charcoal.
Here are the steps to purify water by boiling:
Fill a pot or kettle with water.
Bring the water to a boil.
Keep the water boiling for at least one minute.
Let the water cool before drinking or using.
In situations where you cannot boil water, there are other methods such as using water purification tablets, a water filter, or even the sun’s UV rays for disinfection. Remember, having access to clean, safe water is crucial during a disaster, not just for drinking but also for hygiene and food preparation.
While boiling is a simple and effective method, it’s always advisable to have multiple strategies for water purification ready in case of a disaster. This ensures you’ll have a safe water source no matter the circumstances.
What are water purification tablets?
Water purification tablets are a compact, lightweight, and efficient solution for treating water in emergency situations. They are designed to kill microorganisms in water to prevent diseases such as cholera, typhoid, and dysentery, which can be life-threatening, especially during a disaster. These tablets are typically made from substances like iodine, chlorine, or chlorine dioxide, which are known for their disinfecting properties.
The process of using these tablets is quite straightforward. You simply add the tablet to the water, and wait for the recommended time, usually 30 minutes to four hours, depending on the brand and the purity of the water. The waiting time allows the active ingredients to work, killing bacteria, viruses, and other harmful microorganisms.
Water purification tablets have a long shelf-life, making them an ideal item to include in your emergency preparedness kit. However, it’s important to note that while they are effective in killing many types of microorganisms, they cannot remove chemical pollutants or filter out solid debris. Therefore, if possible, it’s advisable to filter the water first before adding the tablets.
Water purification tablets are a convenient and essential tool for ensuring safe drinking water during a disaster, when access to clean water might be compromised. They are easy to use, transport, and store, making them a reliable choice for emergency water treatment.
How does a portable water filter work?
Portable water filters are a crucial tool for ensuring safe drinking water during disasters. They operate on a simple principle: physically separating harmful contaminants from the water. The first step involves the pre-filter, which removes larger particles such as sediment and dirt.
Next, the water passes through an activated carbon filter. This layer adsorbs organic compounds, chlorine, and some heavy metals, improving both the taste and odor of the water.
The final stage is the membrane filter, typically made from ceramic or fiber. It traps bacteria, protozoa, and microplastics, rendering the water safe to drink. Some advanced filters also include an ion exchange resin to remove heavy metals and a UV light to kill viruses.
To use a portable water filter, you simply need to draw water into it, either by sucking through a straw or pumping manually. The water is then forced through the multiple layers of filtration, resulting in clean, potable water.
It’s important to note that while portable water filters are highly effective against most contaminants, they cannot remove chemicals or salts. Therefore, they are not recommended for use with seawater or chemically contaminated sources.
Maintenance of these filters is also essential for their longevity and effectiveness. Cleaning the pre-filter and backwashing the membrane filter can help maintain the filter’s performance over time.
In the face of a disaster, having a portable water filter can be a lifesaver, providing access to safe drinking water when it’s most needed.
Can bleach purify water?
In the face of a disaster, one may wonder: Can bleach purify water? The answer is yes. It’s a surprisingly effective method of water purification, widely used when no other options are available. A small amount of household bleach can make a significant difference in making water safe for consumption.
It’s important to note that only regular, unscented bleach is suitable for this purpose. The bleach should contain 5-6% sodium hypochlorite, which is the active ingredient that kills bacteria and viruses.
Here’s a simple step-by-step guide to purifying water with bleach:
First, filter the water to remove any visible dirt or debris.
Then, add 1/8 teaspoon (or 8 drops) of bleach per gallon of water.
Stir the mixture and let it stand for 30 minutes.
The water should have a slight bleach odor. If it doesn’t, repeat the dosage and let it stand for another 15 minutes before use.
Remember, while bleach can effectively kill bacteria and viruses, it won’t remove chemical pollutants or heavy metals. Therefore, it’s crucial to source the cleanest water possible before treatment.
Also, this method should only be used in emergency situations where no better water purification methods are available. Long-term consumption of bleach-treated water can lead to health issues. Always prioritize filtered, boiled, or bottled water when possible.
Purifying water during a disaster is a critical survival skill. Knowing how to use common household items like bleach can make a significant difference in such situations.
What is solar water disinfection?
Solar water disinfection, also known as SODIS, is a method of purifying water that utilizes solar energy. It’s an effective way to treat contaminated water, particularly during a disaster when traditional water treatment methods may not be available. The process involves exposing water-filled plastic or glass containers to the sun for a minimum of six hours. The ultraviolet radiation from the sun kills or inactivates many types of disease-causing organisms, making the water safe for consumption.
This method is ideal in emergency situations because it requires minimal resources. All you need is a clear plastic or glass container, sunlight, and time. It’s important to note that the water should be relatively clear for this method to be effective. If the water is murky or has a lot of suspended particles, it should be filtered before undergoing solar disinfection.
Here are the steps involved in solar water disinfection:
Fill a clear plastic or glass container with water.
Place the container in direct sunlight.
Leave the container in the sun for at least six hours.
After six hours, the water should be safe to drink.
Solar water disinfection is a simple yet effective method of water purification. However, it’s crucial to remember that it doesn’t remove chemical contaminants. In a disaster scenario, it can be a lifesaver, providing access to safe drinking water when other options may not be available.
How to store purified water?
Storing purified water properly is crucial, especially during a disaster. The first step is to use clean, food-grade water storage containers. These containers should be thoroughly cleaned and sanitized before use. You can use a solution of one teaspoon of non-scented household chlorine bleach to a quart of water.
Seal the containers tightly, label them with the date, and store them in a cool, dark place. It’s essential to rotate the water storage every six months to keep it fresh. This is where the boil-water method can come in handy.
For larger quantities of water, you might consider a water barrel or a waterBOB, which is a large plastic bag that fits in your bathtub and holds up to 100 gallons of water.
Remember, the key to water storage is cleanliness. Any contamination in the container or the water can lead to bacterial growth, making the water unsafe to drink.
When it comes to safe water storage, it’s important to consider the potential for natural disasters or other emergencies. By preparing in advance and storing water correctly, you can ensure you have a safe, clean supply of water when you need it most.
If you have a well, consider investing in a manual pump or a solar-powered pump in case of a power outage.
Here are some tips for storing purified water:
Use food-grade water storage containers.
Seal the containers tightly and store them in a cool, dark place.
Rotate your water storage every six months.
Consider larger storage options like water barrels or a waterBOB for emergencies.
Keep your storage area clean to prevent bacterial growth.
Remember, the goal is to have a reliable source of clean, safe drinking water in a disaster situation. By following these steps, you can ensure you’re prepared for whatever comes your way.
Conclusion: The Importance of Water Purification During Disasters
In sum, understanding “”How can I purify water during a disaster”” is a critical aspect of disaster preparedness. We’ve explored the concept of water purification, its significance during a disaster, and various methods of achieving clean water, such as boiling, using purification tablets, portable water filters, bleach, and solar disinfection.
Clean water is vital during a disaster for hydration, hygiene, and overall health. Boiling water is a simple yet effective purification method, while purification tablets and portable filters offer convenience and portability. Bleach, though unconventional, can be used for purification, and solar disinfection presents an eco-friendly option.
Storing purified water properly is also essential to ensure its safety over time. The knowledge of these methods empowers individuals to secure clean water sources during crises, reducing reliance on external aid.
As technology continues to evolve, we can anticipate more innovative and efficient water purification methods in the future. This could range from advanced filtration systems to new disinfection techniques. By staying informed and prepared, we can better navigate and overcome the challenges presented by disasters. Remember, the key to survival in any disaster scenario is preparedness and adaptability.
In the face of a crisis, water is the essence of survival. It’s not just about quenching thirst, but also maintaining hygiene and potentially warding off diseases.
Understanding how to locate and purify water is a vital skill, one that could mean the difference between life and death. This knowledge isn’t exclusive to wilderness survival, but extends to urban emergencies as well, where conventional water sources may become compromised.
In the forthcoming sections, we will delve into practical methods of finding water, including natural sources and man-made reservoirs, along with essential purification techniques. So, whether you’re a seasoned survivalist or a novice prepper, this guide is your go-to resource for securing the most crucial element of survival – water.
Where to find water in a disaster?
In the face of a catastrophe, finding water becomes a critical survival strategy. This is because water is the cornerstone of life, and its scarcity can lead to dehydration and death. One of the most reliable sources of water during a disaster is your home’s water heater. It typically holds up to 50 gallons of drinkable water, which can be accessed by opening the drain valve at the bottom.
Another potential source is the toilet tank, not the bowl. The water stored here is usually clean and safe to drink. However, if you’re unsure about its cleanliness, it’s advisable to purify it before consumption.
Additionally, the outdoors offer several water sources. Natural bodies of water such as rivers, streams, and lakes can provide water, though it’s crucial to purify this water to eliminate any potential contaminants. Rainwater is another viable option, and it can be collected using buckets or other containers.
In an urban setting, public facilities such as schools, parks, or municipal buildings often have water fountains or taps that can be used.
Remember, purification is key in all these scenarios. Boiling, using water purification tablets, or a portable water filter can help ensure the water is safe to drink.
Conservation is equally important during a disaster. Avoid wasting water and ration your supply wisely to ensure it lasts until you can find a new source.
In emergencies, knowing where to find water can mean the difference between life and death. Therefore, understanding these strategies is vital for anyone seeking to be prepared for disaster scenarios.
In an emergency situation, having access to clean, drinkable water is paramount. One of the most effective methods is boiling. Boiling water kills many types of disease-causing organisms. Simply heat the water until it reaches a rolling boil and maintain for at least one minute.
Another method is using iodine tablets or chlorine bleach. These chemicals kill most pathogens found in water. Follow the instructions on the package to determine the correct dosage. Note that this method may leave an unpleasant taste in the water.
Another option is using a portable water filter. These devices remove bacteria, parasites and other harmful substances from the water. They are compact, lightweight, and easy to use, making them an excellent choice for emergency situations.
Distillation is another effective method of purifying water. This involves boiling the water and then collecting the steam, which condenses back into water. This method removes all impurities, including chemicals and salts.
In summary, exposure to sunlight can also be used to purify water. This method, known as SODIS (Solar Disinfection), involves filling a transparent plastic bottle with water and leaving it in direct sunlight for at least 6 hours. The UV rays from the sun kill harmful microorganisms in the water.
Remember that these methods should be used as a last resort when no other source of safe drinking water is available. It’s always best to prepare for emergencies by storing a sufficient supply of bottled water.
Can I drink flood water?
In the midst of an emergency situation, finding water can be a critical challenge. One might wonder, can I drink flood water? The short answer is, no. Flood water is often contaminated with numerous pollutants, including bacteria, viruses, and chemicals that could lead to serious health issues.
Flood water is not a safe or reliable source of drinking water. It can contain sewage overflow, harmful bacteria like E.coli, and hazardous substances washed away from roads and industrial areas. Drinking such water can lead to waterborne diseases such as cholera, typhoid, and dysentery, among others.
Instead, look for alternative sources of water in an emergency situation. Some of these include:
1. Rainwater: Collect and store rainwater for consumption. However, ensure to boil it before drinking to kill any potential pathogens.
2. Snow and ice: Melt snow and ice for drinking water. Avoid colored or dirty snow.
3. Natural springs: These can be a good source of water, but it’s crucial to purify the water before drinking.
4. Water from canned goods: Many canned foods contain water which can be used for hydration in emergencies.
Remember, in an emergency situation, finding water is crucial but ensuring its safety for consumption is equally vital. Always purify water before drinking to avoid health risks.
How to store water for emergencies?
Storing water for emergencies is a critical task that requires careful planning and execution. Water storage containers are a must-have for anyone looking to prepare for an emergency. These containers should be food-grade, meaning they are safe to store water that you plan to drink.
Next, consider the water source. Tap water, if it’s safe to drink, can be stored directly in the containers. If you’re using water from a well or a spring, it’s essential to purify it before storage. Boiling is a common method, but you can also use water purification tablets or a water purifier.
Equally important is the storage location. Ideally, the water should be stored in a cool, dark place to prevent the growth of algae and bacteria. Avoid places with direct sunlight or high temperatures.
Here are a few steps to follow when storing water:
1. Clean the water storage containers thoroughly.
2. Fill the container with water, leaving some space at the top.
3. Securely close the container to prevent contamination.
4. Store the container in a suitable location.
Remember, the storage duration also matters. As a rule of thumb, stored water should be used and replaced every six months. This ensures that the water remains fresh and safe to drink.
Lastly, don’t forget about water purification methods during emergencies. Having a plan to purify water can be a lifesaver when your stored water supply runs out. This can include boiling water, using purification tablets, or a portable water filter.
In essence, proper water storage is paramount in any emergency preparedness plan. By following these guidelines, you can ensure that you have a safe and reliable water supply when you need it most.
What is the best emergency water filter?
In an emergency situation, finding a reliable source of drinking water is paramount. Among the plethora of water filters available, the Sawyer Mini stands out as the best emergency water filter. It’s compact, lightweight, and capable of filtering up to 100,000 gallons of water.
The Sawyer Mini uses a 0.1 micron absolute filtration system, effectively removing 99.99999% of all bacteria, such as salmonella, cholera, and E.coli, and 99.9999% of all protozoa, such as giardia and cryptosporidium. It’s a highly efficient tool for emergency water purification.
Moreover, this filter can be attached directly to a drinking pouch, hydration pack, or even a disposable water bottle, making it an ideal choice for emergency situations. It also comes with a drinking straw for direct use from a water source.
Survivalists often recommend having multiple methods of water purification in an emergency. Other options include:
Boiling: Kills most types of pathogens but does not remove chemical contaminants.
Chemical treatment: Effective against most pathogens but may leave an unpleasant taste.
Distillation: Effective against most pathogens and chemical contaminants but requires a heat source and time.
While these methods can be effective, they require time, resources, and may not be feasible in all situations. In contrast, the Sawyer Mini is ready to use instantly, providing clean, safe drinking water in any circumstance. Its efficiency, portability, and ease of use make it the top choice for an emergency water filter.
Can you drink rainwater in emergencies?
In dire circumstances, when access to clean water is limited, rainwater can serve as a potential source of hydration. However, it is essential to understand that while rainwater is generally pure as it falls from the sky, it can pick up various contaminants as it lands. It may collect pollutants from the atmosphere, rooftops, and even the containers used for collection.
Purification is a vital step when considering drinking rainwater in emergencies. Simple methods like boiling, using water purification tablets, or solar disinfection can be effective. These techniques can help eliminate potential pathogens and make the water safer for consumption.
When collecting rainwater, it is advisable to wait for a few minutes after the rain starts. This allows the rain to wash away most of the atmospheric pollutants. Using clean, sanitized containers for collection can further minimize the risk of contamination.
Here are some steps to purify rainwater:
1. Collect rainwater in a clean container.
2. Let it stand for at least an hour. This allows larger particles to settle at the bottom.
3. Filter the water using a cloth or coffee filter to remove smaller particles.
4. Boil the water for at least one minute or use water purification tablets as directed.
Remember, rainwater should only be used as a last resort and must be treated before consumption. Always prioritize finding a reliable source of clean, potable water in emergency situations.
How to collect rainwater for drinking?
Collecting rainwater for drinking during an emergency situation can be a lifesaver. The process is simple and requires only a few basic tools. First, you need a clean container to collect the rainwater. This could be a bucket, a barrel, or even a clean garbage can.
Next, find an open space where rainwater can easily be collected. This could be a rooftop or a yard. Avoid areas near trees or buildings, as these can contaminate the water with debris. Once you’ve found the perfect spot, place your container there and wait for the rain to fill it up.
After collecting the rainwater, it’s important to purify it before drinking. This can be done by boiling the water for at least 10 minutes, using water purification tablets, or a portable water filter.
Collect rainwater in a clean container
Find an open space for collection
Purify the collected water before drinking
Remember, during an emergency situation, having access to safe drinking water is crucial. Knowing how to collect and purify rainwater can make a significant difference in your survival.
While rainwater is a great source of water during emergencies, it’s also a sustainable way to conserve water in daily life. So, mastering the skill of collecting rainwater is not only useful for emergencies but also for promoting sustainability and self-sufficiency.
Is snow a safe water source during emergencies?
Snow, a form of frozen water, is often considered a potential water source during emergencies. However, it’s crucial to understand that consuming snow directly can pose health risks. One of the primary concerns is the low temperature of snow. Consuming it directly can lead to a decrease in body temperature, potentially resulting in hypothermia.
Another concern is the potential presence of impurities in the snow. Snow can contain dirt, bacteria, or even harmful chemicals. Therefore, it’s advised to purify snow before consumption. The safest way to consume snow is by melting it first and then boiling the water. This process eliminates most of the harmful bacteria and parasites that could be present.
Melt the snow: Collect clean, fresh snow and melt it. Avoid colored or dirty snow as it might contain impurities.
Boil the water: After melting the snow, boil the water for at least one minute to kill any remaining bacteria or parasites.
Remember, finding water during an emergency situation is crucial, but it’s equally important to ensure the water source is safe. While snow can be a viable option, it should be consumed with caution, following the appropriate purification steps.
Conclusion: Navigating Water Needs During Emergency Scenarios
Navigating the landscape of water sourcing and purification during emergency situations can be daunting. This post has aimed to provide you with the knowledge and tools necessary to ensure your survival and well-being during such times. We’ve explored where to find water during a disaster, how to purify it, and whether or not certain sources such as flood water or snow are safe to consume.
The importance of storing water for emergencies was also discussed, along with the best emergency water filters available. Rainwater, often overlooked, can be a viable source of hydration in emergencies, provided you know how to collect and purify it effectively.
Remember, each situation is unique and requires different approaches. It’s crucial to understand the risks associated with each water source and to take the necessary steps to ensure its safety before consumption.
As we move forward, advancements in technology and survival strategies may further enhance our ability to secure clean water in emergency situations. It’s important to stay informed and prepared. Remember, knowledge is your best tool in any emergency situation. Stay safe and stay hydrated.
Imagine a day without running water. Not a temporary outage, but a complete, prolonged collapse of our water system. Can you picture it?
The reality is, our water systems aren’t infallible. From natural disasters to aging infrastructure, the risk of a water system collapse is more real than we’d like to admit.
This is not a doomsday prophecy, but a call for preparedness. In the following sections, we will delve deeper into understanding the potential causes, effects, and most importantly, the strategies to survive a water system collapse.
So, are you ready to navigate life if the taps run dry? Let’s explore this together, ensuring you’re well-equipped to face any water-related contingency that may arise in our unpredictable world.
What is the water system collapse?
A water system collapse refers to a catastrophic failure in the infrastructure that supplies water for consumption, sanitation, and other uses. This can be triggered by natural disasters, aging infrastructure, or even human error. When this happens, the availability of safe, clean water is significantly compromised, posing a major threat to public health and safety.
In the event of a water system collapse, the immediate effects can be dire. Without access to clean water, people are at risk of dehydration and waterborne diseases. Sanitation becomes a challenge, increasing the risk of outbreaks of diseases like cholera and typhoid. Moreover, firefighting efforts can be hampered, and industries that rely heavily on water can come to a standstill.
To prepare for a potential water system collapse, it’s important to have a water disaster plan in place. This includes storing enough water for drinking, cooking, and hygiene, as well as having a way to purify water if necessary. It’s also crucial to have a plan for how to dispose of waste safely to prevent the spread of disease.
In addition, being informed about the state of your local water system and the risks it faces can help you be better prepared. For instance, if you live in an area prone to earthquakes, you should be aware that these can damage water infrastructure and disrupt supply.
Remember, a water system collapse can have far-reaching consequences, affecting every aspect of life. Therefore, being ready for such a situation is a crucial part of disaster preparedness.
Understanding the potentiality of a water system collapse is crucial for survival. Stockpiling water is the first step. Experts recommend storing at least one gallon of water per person per day for a minimum of two weeks. This should cover both drinking and sanitation needs. Water storage containers should be food-grade and thoroughly cleaned before use.
Another critical aspect is learning how to purify water. Various methods can be used, including boiling, distillation, and chemical treatment. Having a water purification device on hand is also beneficial.
Knowledge of alternative water sources is also important. Rainwater, snow, and dew can be collected and purified for use. Rivers, lakes, and springs can also serve as water sources in an emergency.
Emergency preparedness should also include a plan for sanitation in the absence of running water. This might involve using portable toilets or digging latrines.
Remember, in a water system collapse, conserving water becomes paramount. Simple measures like not flushing toilets unnecessarily and avoiding activities that require large amounts of water can make a significant difference.
In summary, keep abreast of the latest water conservation and purification techniques. Knowledge is power, especially when it comes to survival.
In a world where water system collapse is a possibility, being prepared can make all the difference.
What are the signs of a water system collapse?
Noticing the signs of a potential water system collapse is crucial for preventive measures. One major indication is the presence of discolored water. This could be a sign of pipe corrosion or contamination, which can severely degrade the water system.
Another sign is a sudden change in water pressure. A significant drop could imply a leak or break in the system, while an increase might indicate a blockage.
Frequent water outages are another red flag. If your water supply is constantly being interrupted, it could mean that the water system is struggling to maintain its functionality.
The presence of unusual odors or tastes in your water is also a sign. This could indicate the presence of harmful bacteria or other contaminants.
To help you identify these signs, here are a few things to look out for:
1. Discolored water: Brown, yellow, or cloudy water can indicate pipe corrosion or contamination.
2. Changes in water pressure: Sudden drops or increases in water pressure can signal a leak or blockage in the system.
3. Frequent water outages: Regular interruptions in your water supply could be a sign of a struggling water system.
4. Unusual odors or tastes: If your water tastes or smells off, it could be due to bacteria or other contaminants.
By recognizing these signs early, you can take steps to prepare for a potential water system collapse, ensuring your family’s safety and well-being. Remember to seek professional help if you notice any of these signs, as handling water system issues can be complex and dangerous if not done correctly.
How can I store water for emergencies?
In the event of a water system collapse, storing water for emergencies becomes a matter of utmost importance. The first step involves identifying suitable containers for water storage. It’s recommended to use food-grade water storage containers, which are designed to prevent the growth of harmful bacteria.
Emergency water storage is not just about having enough quantity, but also ensuring the quality of water. Hence, it is essential to treat stored water to kill any pathogens. This can be done through boiling, distillation, or using water purification tablets.
Another critical factor to consider is the storage location. Ideally, water should be stored in a cool, dark place to prevent the growth of algae and bacteria. Also, remember to rotate your stored water every six months to keep it fresh and safe for consumption.
Here are a few steps you can follow for effective water storage:
Choose the right containers: Use food-grade water storage containers or cleaned, sanitized soda bottles.
Treat the water: Use water purification tablets or boil the water before storing.
Store in the right place: Keep the containers in a cool, dark place.
Rotate regularly: Replace stored water every six months.
In addition to storing water, you might want to consider installing a rainwater harvesting system. This can provide a sustainable water source when the regular water system fails.
Remember, water is a vital resource during emergencies. Having a well-thought-out plan for water storage can make the difference between survival and disaster in the event of a water system collapse.
What are the alternatives to a collapsed water system?
In the event of a water system collapse, it’s crucial to know the alternatives available for sourcing clean, drinkable water. One such option is rainwater harvesting, a sustainable method that collects and stores rainwater for future use. With proper filtration, this water can be used for drinking, cooking, and hygiene needs.
Another alternative is well water. If your location permits, drilling a well can provide a consistent source of water. However, this option requires regular testing to ensure the water’s safety.
Bottled water can also be a viable option, especially in the short term. It’s convenient and safe, but relying solely on bottled water can be costly and environmentally unfriendly.
If you live near a natural water source like a river or lake, it can serve as a water supply. However, it’s essential to purify this water before use to eliminate potential pathogens.
Furthermore, portable water filters and purification tablets have become increasingly popular for emergency preparedness. These devices can make almost any water source safe to drink, making them a valuable tool in a water system collapse scenario.
Lastly, solar stills are an innovative solution that uses the sun’s energy to evaporate and condense water, effectively purifying it. This method is especially useful in arid regions with abundant sunlight.
Each of these alternatives has its advantages and challenges, and the best choice will depend on your specific circumstances. However, having a plan in place and being prepared is the best defense against a potential water system collapse.
How long can I survive without water?
The human body is roughly 60% water, and this crucial substance plays a vital role in numerous bodily functions. Survival without water varies based on several factors, including the individual’s health, age, and the surrounding environment. However, experts generally agree that a person can only survive for about 3-5 days without water.
When the water system collapses, your body will start to dehydrate, leading to a series of health issues. Initial symptoms of dehydration include fatigue, dry mouth, and increased thirst. As the condition worsens, you may experience dizziness, rapid heartbeat, and even unconsciousness.
Preparation for a potential water system collapse should include storing safe drinking water. The U.S. Federal Emergency Management Agency (FEMA) recommends storing at least one gallon of water per person per day for at least three days. This supply should be enough to cover drinking and sanitation needs.
Water purification tablets
Portable water filters
Boiling
These methods can make unsafe water safe to drink, which can be a lifesaver in a situation where the water system has collapsed.
Remember, water isn’t just for drinking. It’s also necessary for cooking, cleaning, and sanitation. Therefore, it’s essential to consider all of these needs when preparing for a potential water system failure.
In the face of a water system collapse, understanding how long you can survive without water and knowing how to purify and store water can make a significant difference in your survival chances.
What are the risks of a water system collapse?
A water system collapse poses significant risks to human health, the economy, and the environment. One of the primary concerns is the lack of access to clean, safe drinking water. This can lead to dehydration, malnutrition, and the spread of waterborne diseases, such as cholera and typhoid fever.
Additionally, a collapse could disrupt essential services that rely on water, including hospitals, schools, and businesses. This can lead to economic instability and a decline in living standards.
From an environmental perspective, a water system failure could lead to uncontrolled sewage spills, causing severe pollution in rivers, lakes, and oceans. This can harm aquatic life and disrupt ecosystems.
The risks associated with a water system collapse are not limited to these areas, but also include:
Food production: Agriculture heavily relies on water for irrigation. A water system collapse could lead to crop failure and food shortages.
Energy production: Many power plants require water for cooling. A collapse could disrupt energy supplies, causing blackouts and hindering industrial processes.
Public health: Without a functioning water system, sanitation services would be compromised, leading to increased risk of disease outbreaks.
Understanding these risks is the first step towards preparing for a potential water system collapse. It’s crucial to have contingency plans in place, including water storage solutions, water purification methods, and alternative sources of water.
How can I purify water in emergencies?
In the event of a water system collapse, having the ability to purify water becomes a critical skill. Boiling water is the simplest and most effective method of purification. It eliminates bacteria, viruses, and parasites that can cause illness. Boil the water for at least one minute to ensure it’s safe to drink.
Chemical treatment, using chlorine or iodine, is another method. These chemicals kill most pathogens in the water. However, some parasites may be resistant. It’s important to follow the instructions on the packaging to ensure effective treatment.
A water filter is also a viable option. There are portable filters designed for emergency situations. They can remove bacteria, parasites, and often, chemicals. However, viruses are usually too small to be filtered out.
Ultraviolet light is an effective, though less common, method. Portable UV devices can kill bacteria, viruses, and parasites. However, they require a power source and may not be as effective in cloudy or turbid water.
Lastly, distillation is a method that involves boiling water and then collecting the condensed steam. This method can remove bacteria, viruses, parasites, and chemicals.
Remember, in an emergency, having multiple methods of water purification increases your chances of survival. Each method has its pros and cons, and the best option may depend on your specific situation.
In closing, understanding the concept of a water system collapse and recognizing its signs are crucial steps towards preparedness. It’s imperative to know how to store water for emergencies and be aware of alternatives to a collapsed water system. The human body can survive only a few days without water, which underscores the importance of this issue.
The risks associated with a water system collapse are severe and can impact our daily lives significantly. Hence, learning how to purify water in emergencies is a vital survival skill. Being prepared not only involves having the knowledge and resources but also being proactive in implementing these measures.
Looking ahead, advancements in technology and infrastructure may provide new solutions to these challenges. However, the possibility of a water system collapse remains a pertinent issue. Therefore, it’s essential to stay informed about developments and trends that could affect our water supply.
All in all, being ready for a water system collapse is not just about survival – it’s about taking responsibility for our lives and those of our loved ones. So, let’s take the lessons from this post and make sure we are prepared, come what may.
With the recent breaking news from the US Government that there is a serious National Security Threat, we all should be very concerned. We should also intensity our efforts to get better prepared.
The report raises a very significant topic that we should all be aware of and prepare for. Read on …
What Happens If We Get Hit by an EMP Attack?
Imagine one day your phone, computer, and even your car suddenly stop working. This could happen if we were hit by an EMP, or Electromagnetic Pulse, attack. It sounds like something out of a movie, but it’s a real threat that could change our lives in an instant. Here’s what you need to know, broken down so it’s easy to understand.
Right Away Trouble
Gadgets Gone Wild: First off, anything electronic might just quit. This means no texting, no internet, and even cars might not start. Imagine trying to do anything without any of your tech.
Lights Out: The power could go out everywhere. It’s not just about not being able to charge your phone; hospitals, stores, and basically everything that needs power would stop working.
Can’t Call for Help: With phones and the internet down, calling for help or finding out what’s going on would be really hard. We’d be cut off from each other.
Stuck Where You Are: Without cars or buses, getting anywhere would be a huge challenge.
Problems That Follow
Hospitals in a Crunch: Without power, hospitals would struggle to take care of sick people, especially those who need machines to stay alive.
Money Trouble: Businesses wouldn’t be able to work right, and buying things would be tough. This could lead to a big economic mess.
People Getting Scared: With everything out of whack, people might start to panic. This could lead to chaos in the streets.
No Water: This is a big one. With no power, getting clean water could become a problem. Water pumps need electricity, so no power means no water.
Bouncing Back?
Fixing everything wouldn’t be quick or easy. We’d have to rebuild a lot of what makes our world work, like the power grid and communication networks. And we’d have to think about how to make them tough enough to survive if this ever happened again.
Why We Need to Get Ready
This all sounds pretty scary, but there are things we can do to get ready, just in case. Here’s why it’s important:
Be Informed: Knowing about the risks and what to do can make a big difference.
Make a Plan: Have a family plan for what to do if there’s no power or water. Know where to meet and how to stay safe.
Emergency Kit: Put together a kit with things you might need, like water, food that doesn’t go bad, a flashlight, and a radio that doesn’t need electricity.
Wrapping Up
An EMP attack could seriously mess up our way of life, but by being aware and getting ready, we can handle it better. It’s all about knowing what could happen and having a plan to deal with it. Let’s not wait until it’s too late to start thinking about what we’d do.